Sunday, June 29, 2014

Apple Cinnamon Blueberry Pancakes

These pancakes are egg-free
But that's not stopping them from being DELICIOUS!

You'll need:
1 cup flour
1 tablespoon brown sugar
1 tablespoon baking powder
1 tablespoon vanilla protein powder (optional)
1 teaspoon cinnamon
1/2 cup almond/coconut milk
1/2 cup apple juice
1/2 cup apple sauce
1 teaspoon vanilla
1 pint blueberries
For streusel: 
Crushed graham crackers
butter

FYI: I had some leftover crushed graham crackers from these:Toffee cheescakes 


In a large bowl, 
sift together dry ingredients.
Add milk,
apple juice,
apple sauce, 
and vanilla

Spoon batter onto hot griddle.
Sprinkle with streusel 
and blueberries. 

Cook until bubbles begin to form.
Flip with caution.
Cook for 2 more minutes.
Serve with butter and syrup.

Enjoy!

Thursday, June 26, 2014

Fajitas & Tortillas

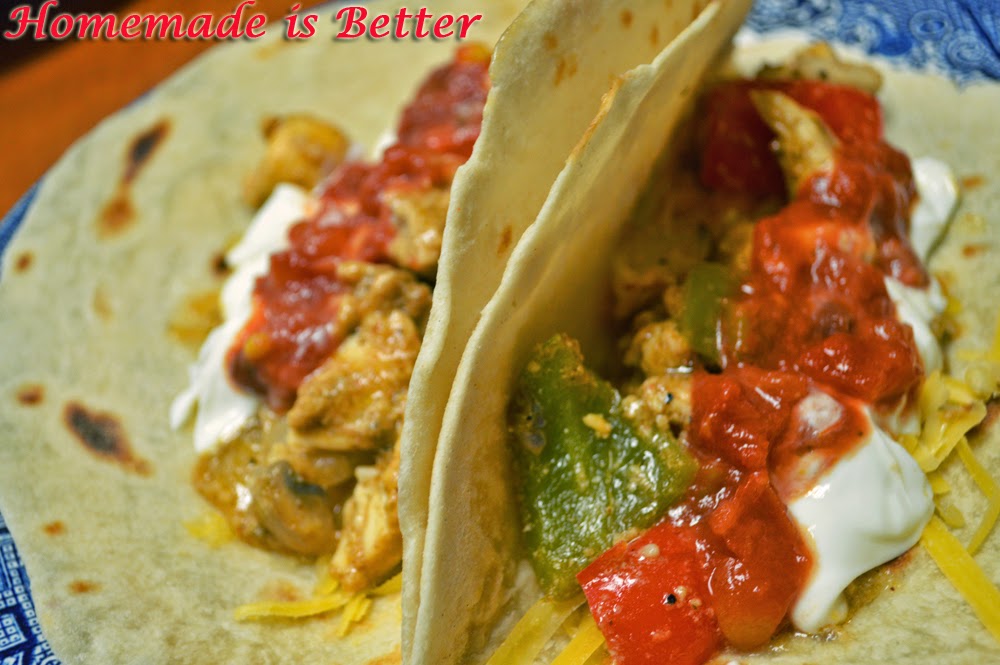
 Chicken Fajitas and Homemade Flour Tortillas


This is probably the main reason 
my husband married me.
Well maybe not the *main* reason, 
but it was definitely a contributing factor!

Chicken Fajitas are pretty much a no-brainer.
The one piece of advice I can offer is
MARINATE!
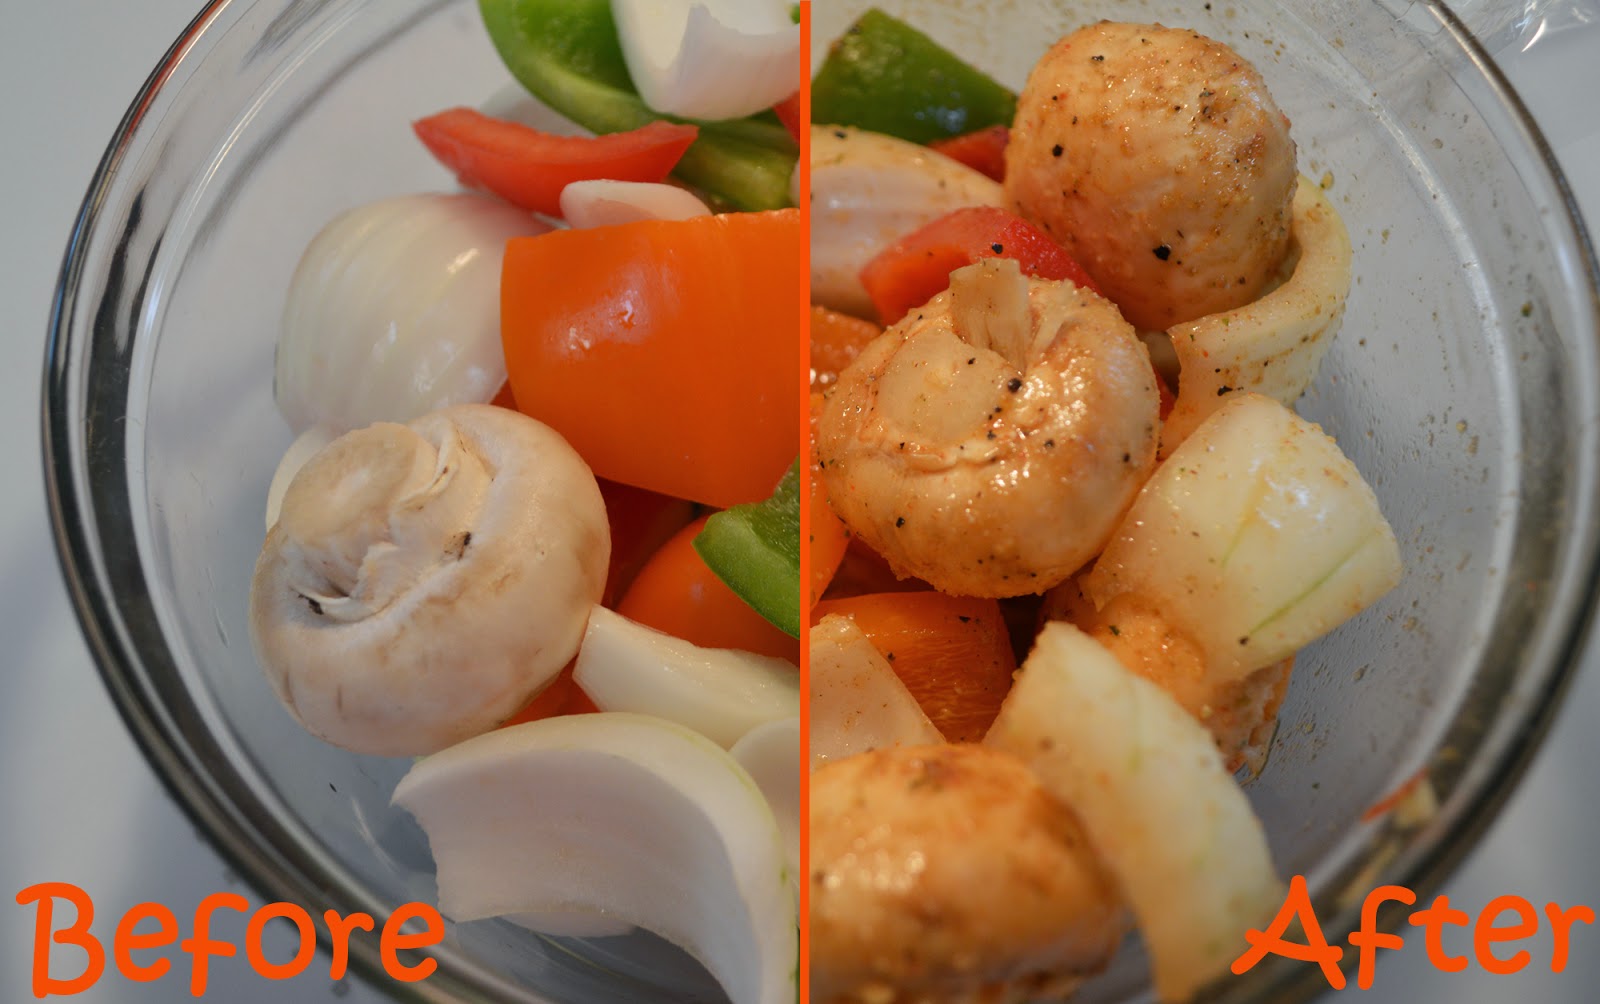
Combine lime juice, cumin and fresh garlic
with a little olive oil, hot sauce 
and whatever other seasonings you like.
 Marinate your chicken and veggies separately.
It really makes a world of difference.

While that marinates,
make tortillas.

When I was a just a little girl,
my great-grandmother taught me how to make
her famous homemade flour tortillas.
Here is Grandma on her 84th birthday.
What I remember most about Grandma's tortillas
is she never measured anything,
she did it all by hand, 
she handed me a ball of dough just to play with,
and she always, always burnt the first one,
(Grandpa liked it that way anyway.)

Now, every time I make tortillas
all those childhood memories come rushing back,
and that's probably why 
they are one of my favorite things to make.

My recipe's evolved a little over the years...

Here's what you'll need:

4 cups of flour, 
2 teaspoons of baking powder,
1 teaspoon of salt
*1/2 cup of lard, shortening, butter, or oil
1 1/2 cups hot water
extra flour for rolling out tortillas

*Here's the dirt on lard:
I've done some experimenting
and I find the best results come from 
half lard half shortening.
Pretty sure Grandma always used straight up lard.
Now you may be wondering, what is lard?
I really wasn't sure either, 
until I found that it is basically
 just rendered animal fat.
So if you're totally grossed out by that, 
try one of the alternatives 
and let me know your results.
One of these days I'm going to try coconut oil.

Directions:

Mix dry ingredients in large Kitchenaid mixer
add the lard/shortening (or whatever)
one teaspoon at a time 
with the dough hook on low.
You can also do this with your fingers or a pastry cutter.
You want the lard/shortening/flour mixture to get all crumbly.
With the dough hook still on low
slowly add hot water. 
Let the dough hook do all the kneading for you.
After a few minutes you should have a nice smooth dough ball
Set it on a floured surface, 
cover it with a damp kitchen towel, 
and let it rest for a few.

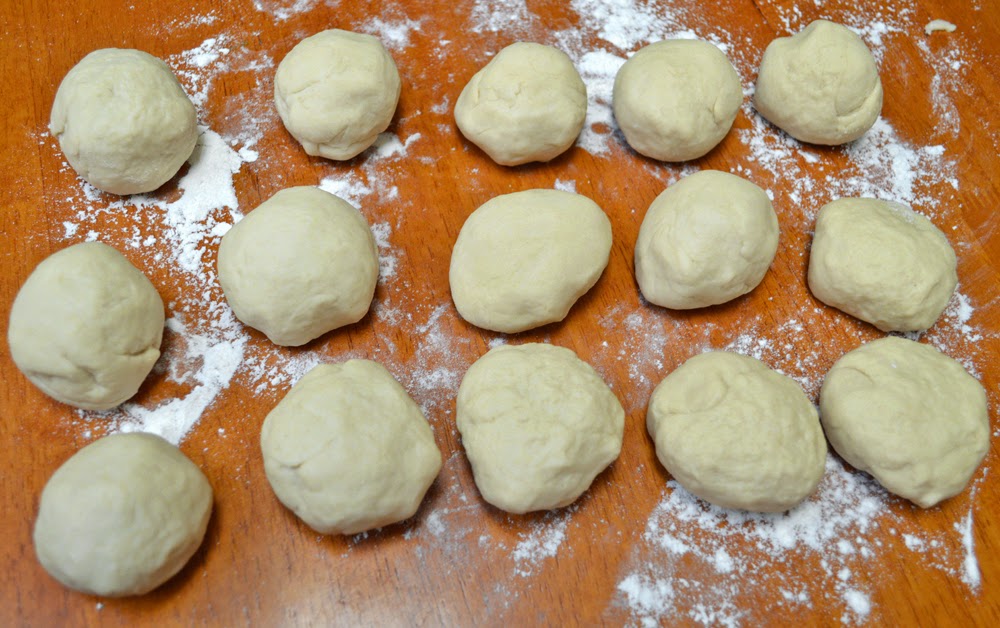
Next roll your dough into balls.
Try to keep them around the same size 
and keep those babies covered with a damp towel
so they don't dry out!

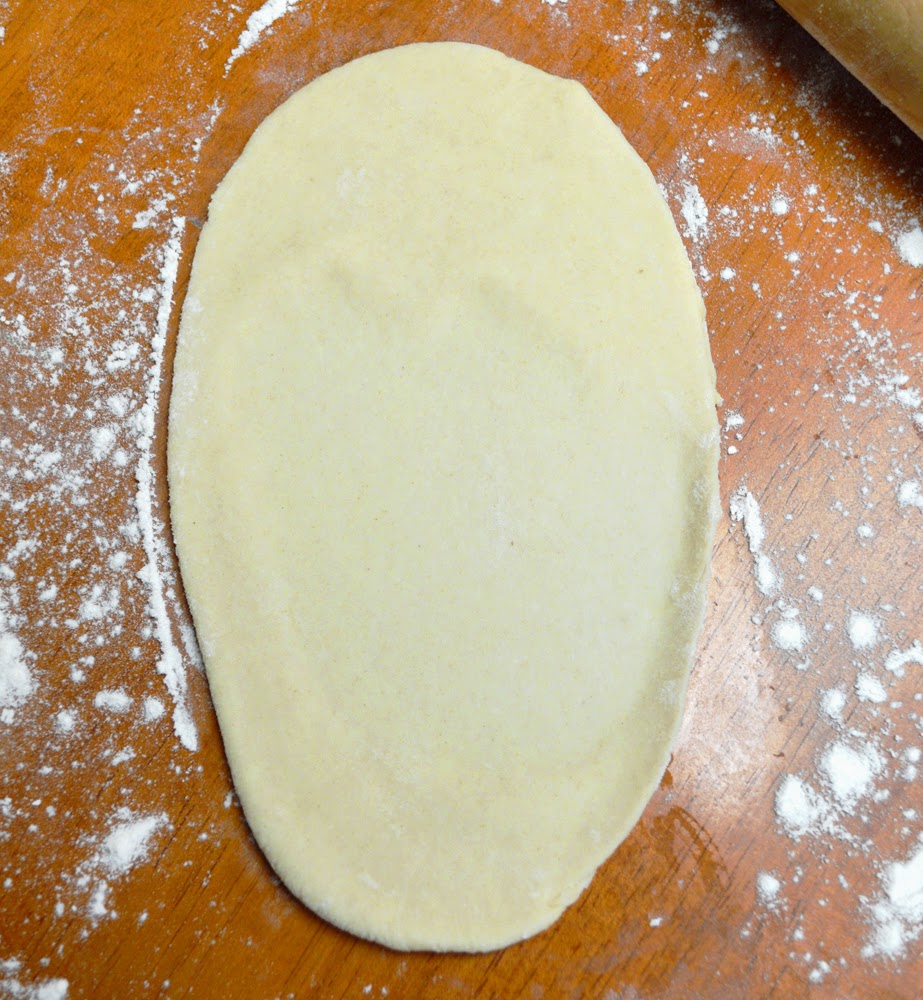
Roll each one flat and as round as possible.

This is my method: 

Start with a tall skinny oval shape.
Then flip it over, turn it horizontally
and roll it some more 
until you have a (sort of) circle.

I've found they get rounder with every batch,
but they'll probably never be 
as perfectly round as Grandmas.

*FYI: Don't use a tortilla press. 
They are for corn tortillas and they will never
 get the dough as thin as you need it to be.
You'll end up with gordita/flat bread spheres
(which my husband loves by the way.)
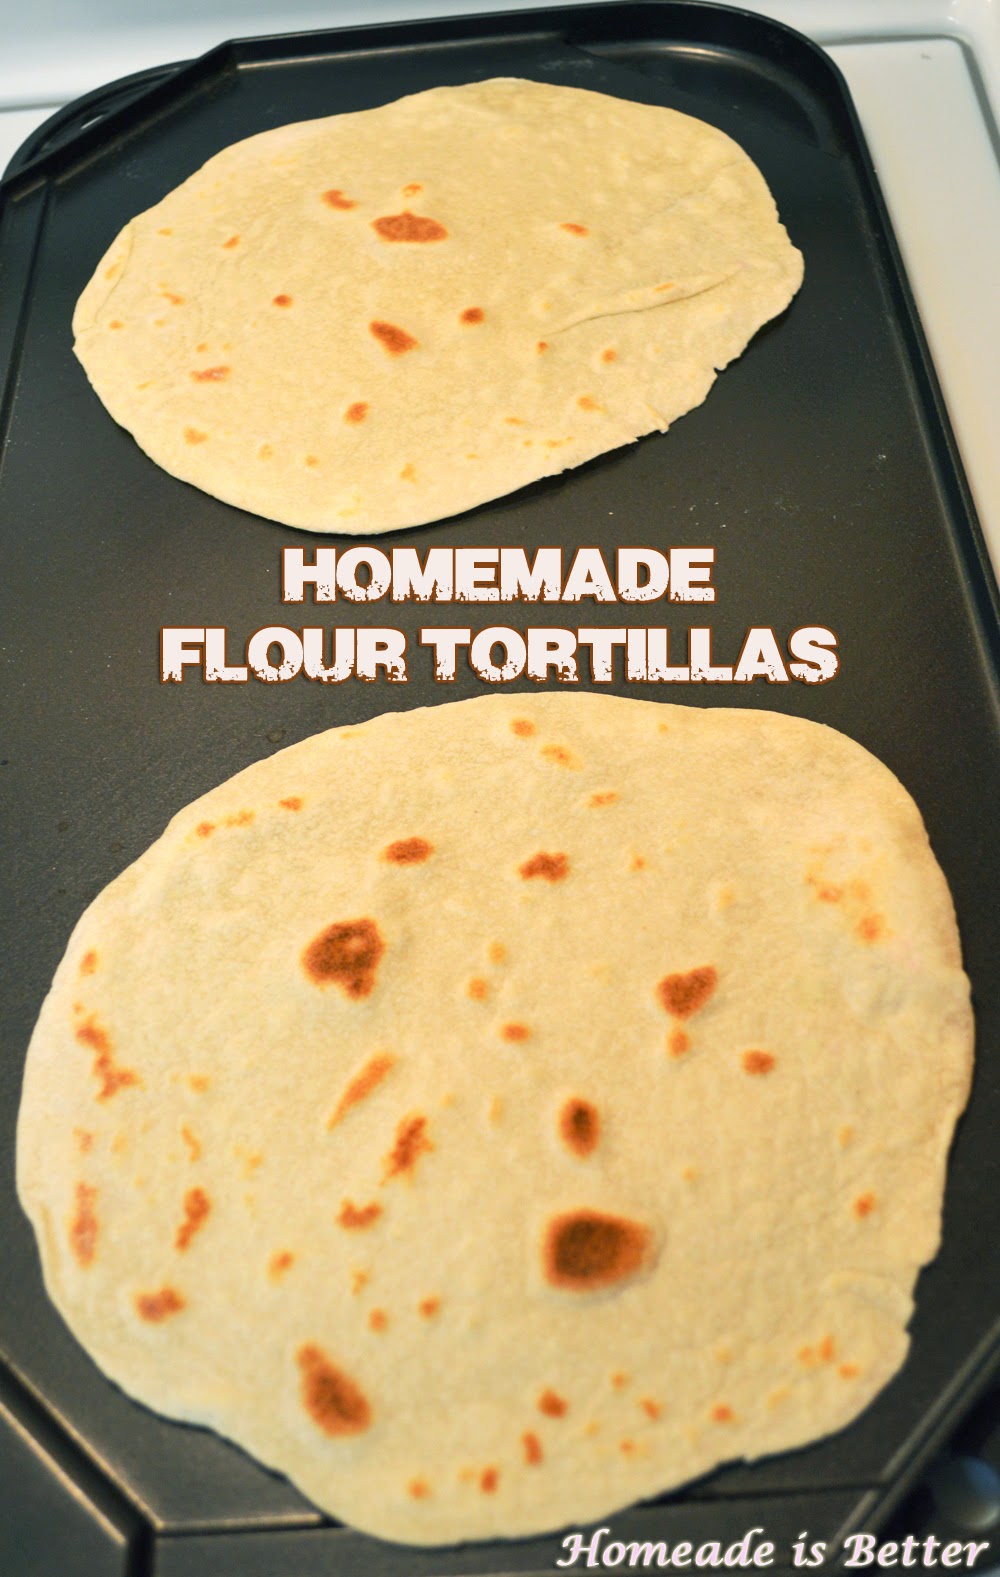
Cooking tortillas

I use a griddle but if you have a comal, use that! 
Medium heat, 
You don't want them to burn.
Flip with caution, 
You don't want to cook your fingertips!

See these beautiful bubbles.
 Tortillas are done when those bubbles 
turn a nice brown color on both sides.

Eat one right way 
because you totally deserve it!

Keep the rest under a towel, 
or in a covered pan in a warm oven 
until you're ready to serve them up. 

Now back to the fajitas

Start with the chicken 
and cook until done, stirring frequently.
Remove chicken. 
Cook up the veggies
But don't overcook them, 
you want firm not mushy!
Add the chicken and give it a stir.

Now you're ready to serve up 
your homemade tortillas and chicken fajitas!

Enjoy!

Wednesday, June 25, 2014

Kung Pao Chicken Made at Home

宫保雞丁
 So this kind of goes against the theme
but I LOVE Chinese take-out! 
However, 
we live outside of city-limits 
and there's certainly no food-delivery out here.
Hence, Kung Pao Chicken Made at Home!

This is one of those easy weeknight recipes
that I LOVE!
Honestly it's only semi-homemade
because it calls for store-bought sauce,
which makes it super quick and easy!

It's also cooked in the slow-cooker 
but only takes 4 hours,
which makes it the perfect go-to meal 
for those incredibly busy days when 
you haven't given a single thought to dinner
until sometime in the late afternoon.

Here's how easy it is:
Step One: Chicken Goes into the Crock Pot 
Q: Do you say "crock pot" or "slow cooker"?

Tips: Use non-stick spray for easy clean up.
I always, always season my chicken breasts prior to cooking, 
even if the recipe doesn't call for it, because nobody likes bland chicken. 
This time I seasoned with a Garlic Herb blend. 

Cook on High 3.5 Hours 
until cooked through but not completely fall-apart

Step Two: Chicken comes out of the Crock pot
Cut into Cubes
Back into the crock pot it goes.

Step Three: Chop Veggies

Step Four: Prepare Sauce
I mixed Panda Express Kung Pao Sauce
and half a jar of 
apricot/pineapple preserves

Step Five: Add chopped veggies 
and sauce to Crock Pot.
Stir!
Cook for 30 more minutes on High.

Step Six: Cook up some rice 
while Kung Pao is finishing up.
I love this Basmati Rice
which cooks up in 20 minutes.

Last step: Serve over rice.
*Garnish with Green Onions
and Peanuts*
Enjoy!

Adapted from The Frugal Girls

Tuesday, June 24, 2014

Toffee Cheesecake Bites


Two words: 
Toffee-Cheesecake!
Need I say more? 

My super sweet Mother-in-Law made mini cheesecakes 
for our Christmas Eve Party last year
 and I have been craving them ever since. 
So here I am 6 months later,
 about to die if I don't get me some of that 
bite-sized cheesecake goodness! 

Cheesecake happens to be one of my 
all-time favorite desserts,
but the thought of making an entire cheesecake
 is kind of intimidating.

However when I was researching mini-cheesecake recipes, 
I discovered, there's really not much to it!

You've got the crust:
Courtesty of my four-year-old.
(Note to self: make sure the lid's on tight!)

I think it's safe to say anything in the 
graham cracker/cookie family 
would work wonderfully. 
We went with a handful of 
Goldfish Grahams "Smores" 
and a handful of 
Golden Graham cereal.
Add 1/2 Teaspoon of crumbs to 
mini-muffin pans. 
Next time I think I'll skip the liners.

Now for the cheesecake filling:
Start with 8 oz. cream cheese 
at room temperature. 
Mix until smooth.
Nobody wants a lumpy cheesecake!
Add in a Teaspoon of Vanilla,
1/2 cup of sugar,
and 1 egg. 
Mix!
At this point I did a taste test 
(Don't consume raw eggs, I know!)
and it tasted like cheesecake, 
albeit a bit runny. 
Since I'm a rebel,
and I insist on putting my own spin 
on everything,
I added a splash of this:
Sugar free white chocolate syrup
Mmmmmm...
Fill those cups!
Bake for 15-20 minutes at 350 degrees.

While they're cooling
make a tasty topping!

I melted down 
Health Milk Chocolate Toffee Bits
I'm betting you could top these babies 
with just about anything...
Cherry pie filling, 
white chocolate,
dark chocolate ganache...
the options are endless.

Now spoon the topping 
onto the cheesecake bites
and chill for a couple hours.


Enjoy!

Wednesday, June 18, 2014

DIY Body Scrub

Chances are you already have the ingredients 
to make your own body scrub.
If so, I strongly urge you to do so.
Trust me, your body will thank you! 

I've had my eye on a few different DIY body scrubs 
on Pinterest for a while now.
So today when my Dove ran out, 
in hopes of avoiding using my hubby's "man soap" 
and smelling like an Irish spring,
I checked to see what ingredients I had on-hand.
Here's what I came up with:

1/4 cup Folgers Chocolate Silk coffee grounds
1/8 cup dark brown sugar
1/8 cup light brown sugar
1 tablespoon granulated (white) sugar
1/8 cup honey
1/8 cup coconut oil 
1 tablespoon vanilla extract
1 tablespoon vitamin E oil 

So far I tried this on my arms and hands
and I seriously cannot wait to scrub up tonight. 
This stuffs smells amazing!


Sweet Hawaiian Bread

Sometimes I surprise myself. 
 I have never had any luck at all with bread. Honestly, I made a banana bread once that could have been used as a weapon--it was bad! However I seemed to have turned over a new leaf or should I say, loaf

Although I must admit, I owe it all to my KitchenAid stand mixer. Ever since I bit the bullet and jumped on the KitchenAid bandwagon, I've managed to produce loaf after loaf of super tasty bread. I'm also happy to report that after a few "mushroom clouds" I've finally managed to get my bread to actually look like bread! 

I really hope this is not just a fluke!

Here's a recipe I adapted from Allrecipes "Amish White Bread" but I'm calling it Sweet Hawaiian Bread because I think it tastes exactly like those sweet Hawaiian rolls we all know and love except in loaf form. 

Start with 2 cups of warm water, 
2/3 cup of sugar, 
and 2 packets of active dry yeast. 
Let those ingredients foam up in large KitchenAid bowl. 
Am I the only one who is totally weirded out by yeast? 
It's kinda creepy, am I right?
Add 1 1/2 teaspoons of salt 
and 1/4 cup of vegetable oil.
Attach the dough hook and mix at the lowest speed. 
Next Add 6 cups of bread flour, 
a half cup at a time. 
Alternate between speeds 1 & 2. 
This process seemed to take forever. 
But boy was it worth it! 
Now I'm certainly no expert but after adding all the flour, 
the dough seemed a little dry to me. 
So I added a splash of coconut milk. 
This may have been the secret ingredient!
Take out the dough, knead it by hand a bit,
and form a big dough ball.
Oil the bowl 
and roll the dough ball around in the oily bowl.
Then seal the bowl up with plastic wrap 
and drape a towel over it. 
Since it was a pretty cold day, 
I tried this trick I read in one of the reviews: 
Turn on the oven for about 30 seconds, 
just long enough to warm it up,
then turn it off and 
let dough rise in the oven for an hour. 
After the dough doubles in size, 
punch it down and 
knead it a bit more by hand. 
Divide it into two ovalish loaves 
and place in greased/floured loaf pans. 
Let those babies rise for 30 more minutes. 
Then bake for 30 minutes at 350 degrees.
Now eat your delicious sweet bread!
I served the bread with bbq chicken, mashed potatoes & corn 
and my family gobbled it all up!


Thursday, June 12, 2014

Purple Kale Smoothie

Purple Kale, Where have you been all my life? 


For this smoothie I blended: 

Purple Kale, Raspberries, Bananas, Peaches, Peanut Butter, Protein Powder, Coconut/Almond Milk and ice. 

I love my blender! 


I've been blending up a storm lately and I've created some pretty crazy concoctions. What do you blend? Share your ideas in the comments!


Tuesday, June 10, 2014

Better than Subway's White Chocolate Raspberry Cheesecake Cookies


Sure you can buy these at Subway 3 for $1, 
but don't count on them being very fresh after sitting out for who knows how long. 
OR...
For about $5 you can make a few dozen at home, 
then proceed to eat them ALL because they are so darn tasty! 
I took a batch of these beauties to a BBQ and they were GONE within the first hour. 

You may already have these basic ingredients on hand: 
1/2 cup Butter (aka one stick) 
2 Tbs. Shortening (Crisco) 
1/2 cup Brown sugar 
2 Eggs
3/4 cup of All-purpose flour

Now you're probably wondering why only 3/4 cup of flour? 
There's no way I can make 3 dozen cookies with that! 
You're absolutely right, that's why you're going to want to pick up 
the secret weapon

2 Boxes of "Jiffy" muffin mix

Don't forget the cream cheese (4 oz.) and the white chocolate chips (1 1/2 cups). 
And milk because, let's face it after scarfing down a dozen of these, you're going to need it.

Step One: Let your butter and cream cheese soften while you make dinner. 
Okay you don't have to make dinner. 
Yes, you can just have these cookies for dinner, I won't judge. 
Step Two: Beat together the cream cheese, butter & shortening.
This is the part where you hug your husband 
thanking him for buying a KitchenAid stand mixer, 
which literally takes ALL the work out of beating cream cheese! 
Thanks, you get the first cookie! 
Step Three: Add brown sugar and Beat some more. 
Step Four: Add an egg and Beat some more. 
Step Five: Repeat Step Four.
Step Six: Fold in flour along with the secret weapon.
Step Seven: Stir in white chocolate chips 
Go ahead, give a couple chocolate chips to the four-year-old 
who refuses to let go of your leg. 
Step Eight: Let the dough chill out in the fridge for a half hour. 
This is the hard part, 
you may need to go watch an episode of Mindy or something. 
I suppose if you're a glutton for punishment, 
you'll wash the dinner dishes. Booo!
Step Nine: Preheat the oven to 350 and line a cookie sheet with parchment paper. 
If you're paranoid like I am, 
spray that sucker with nonstick spray for good measure.
Step Ten: Roll dough into 1-inch balls and place on cookie sheet.
Be sure to leave these guys some room because they're going to spread. 
Step Eleven: Bake for about 12 minutes until the edges turn golden brown. 
Step Twelve: Let them rest on the pan for a minute, 
then cool on a baking sheet until you just can't take it anymore. 
Then eat them, 
give some to family and friends, 
or just eat every last one and pretend nothing happened.
What cookies? I don't know what you're talking about! 

Adapted from Six Sisters Stuff, who adapted from Bakergirl


Monday, June 9, 2014

Meatless Monday: Veggie Burritos

No animals were harmed in the making of these burritos.
Today for "Meatless Monday" I grilled up some veggies, cooked basmati rice with lime, heated a can of organic black beans, topped it all off with a little cheese, homemade guacamole & salsa we had leftover from the weekend, then wrapped it all up in a tasty tortilla. MMmmmmmm......


I was so excited to try out my new grill/griddle and let me tell ya, that thing works like a champ! I foresee a lot of grilled veggies in our future. It was so easy! Just brush on a little garlic olive oil, lightly season, and rotate the veggies every few minutes then after 10 minutes, when you start seeing those beautiful grill lines you know it's grilled to perfection.

So I cheated and used the raw flour tortillas. You can find these at the grocery story in the refrigerated section. They're almost as good as homemade and WAY better than the pre-cooked kind.Top it all off with cheese, guacamole, salsa, sour cream, olives, onions, lettuce, tomatoes, pretty much whatever you want--Just NO meat, it's Meatless Monday!

Adapted from The Pioneer Woman LOVE HER!